
Process > Setups Pt. I
My Trading Edge: A Process, not a Setup

The first thing every trader looks for when they want to become profitable is a setup.
A pattern.
A signal.
A combination of variables that says, “Enter here.”
That instinct is understandable, and it’s exactly why most traders never make it past the break-even stage.
A setup only tells you where a trade might exist.
It does not tell you whether that trade should be taken, how much risk it deserves, or whether today’s conditions support it at all.
The traders who eventually make a living doing this figure out something uncomfortable:
process has to come before setup, or none of the patterns matter.
My process
The first thing we need to get on the table are the key differences in two terms you will read a lot from here forward:
Leg and Segment
They are basic terms with basic definitions, but they are the key to everything and will be where you inevitably make the most mistakes in the beginning.
First let us define what a segment is:
A segment is a move that gains or loses another segment
Now I know where your head just went, how do you gain or lose something? We will start with basic diagrams and then get into details:
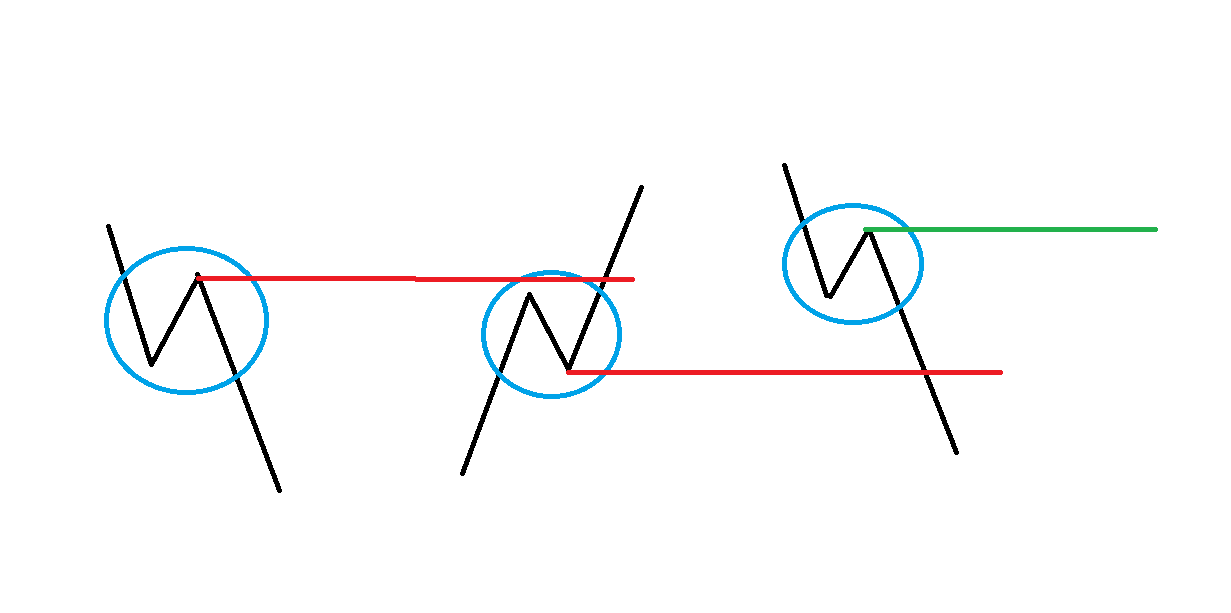
If a segment is a move that gains or loses another segment, this diagram shows three segments (circled in blue). For the sake of argument, let us pretend the one on the left is breaking support from further left. The middle up-segment is breaking the high of the left down-segment, and the one on the right is breaking the low of middle up-segment.
Breaking the resistance to the left is “gaining” something, which also validates that the up-segment in the middle is real. The down-segment on the right is “losing” something by breaking the low of the up-segment in the middle, thus validating the down-segment on the right.
So, let’s go back to the definition: A segment is a move that gains or loses another segment. Does that make more sense now? Each circled segment is valid because it gained or lost a segment to its left.
One final note on segments:
For the purpose of this process, a segment shall be defined as a pullback (meaning 1 opposing color bar) on a 1-minute chart and higher.
Down-segment on the left, up-segment on the right that gained the down-segment.
Now let’s talk about Legs
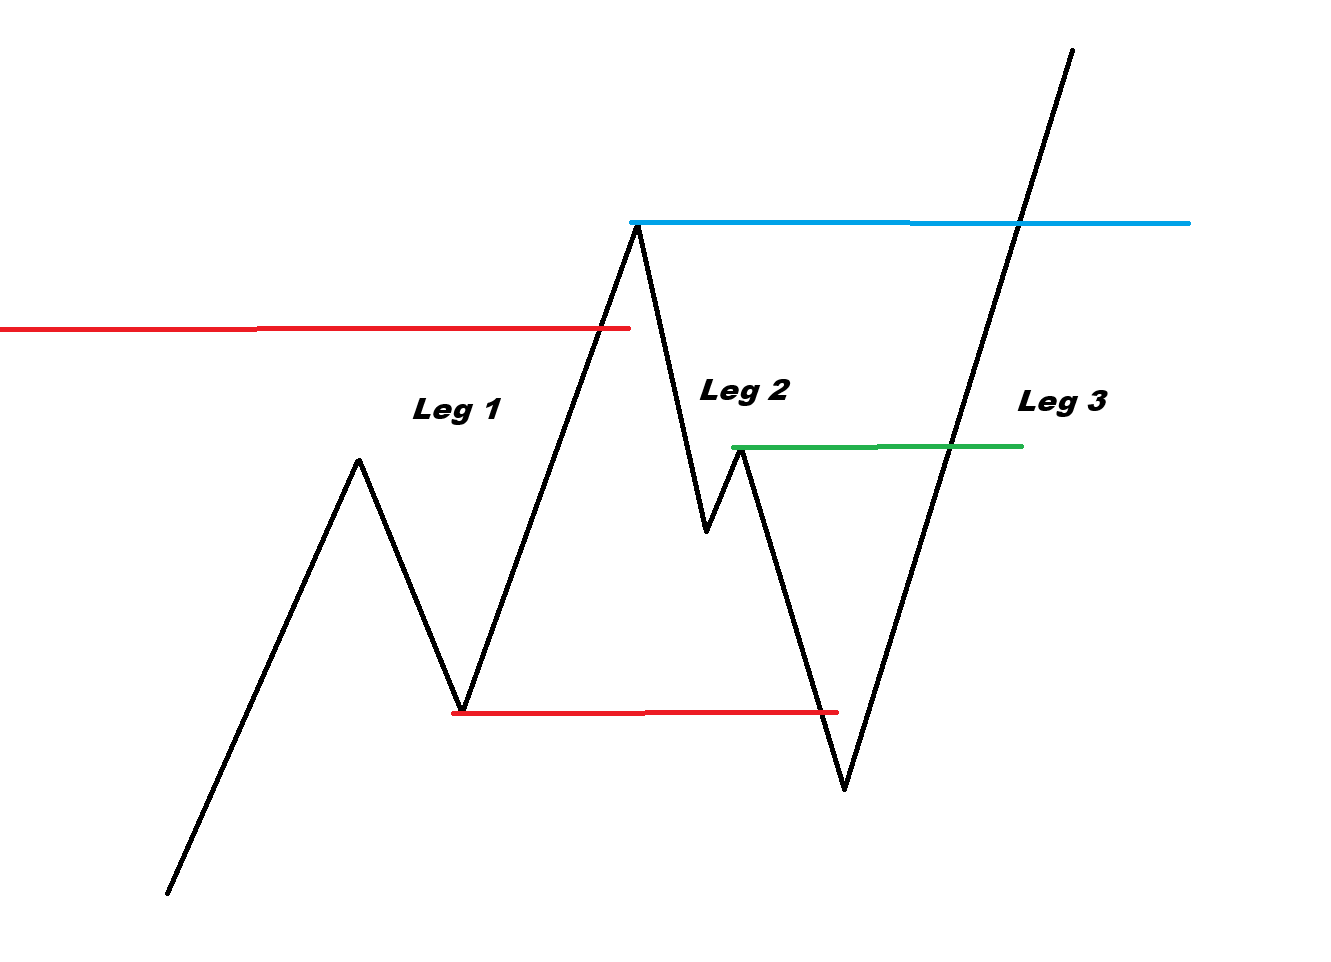
A leg is comprised of 3 segments, meaning a leg has 3 components that have either gained/lost/gained OR lost/gained/lost. When we have these components together, we call it a 3-leg and then refer to each component as Leg 1, Leg 2, and Leg 3. This is a semantics thing as they are still technically “segments” but denoting them as legs is important for clarity.
As you get a more innate understanding of this you will realize this can happen in two different ways:
Leg 1 can lose or gain a segment to the left
or
Leg 3 can lose or gain a segment to the left
(Leg 2 is never going to do anything other than lose/gain leg 1)
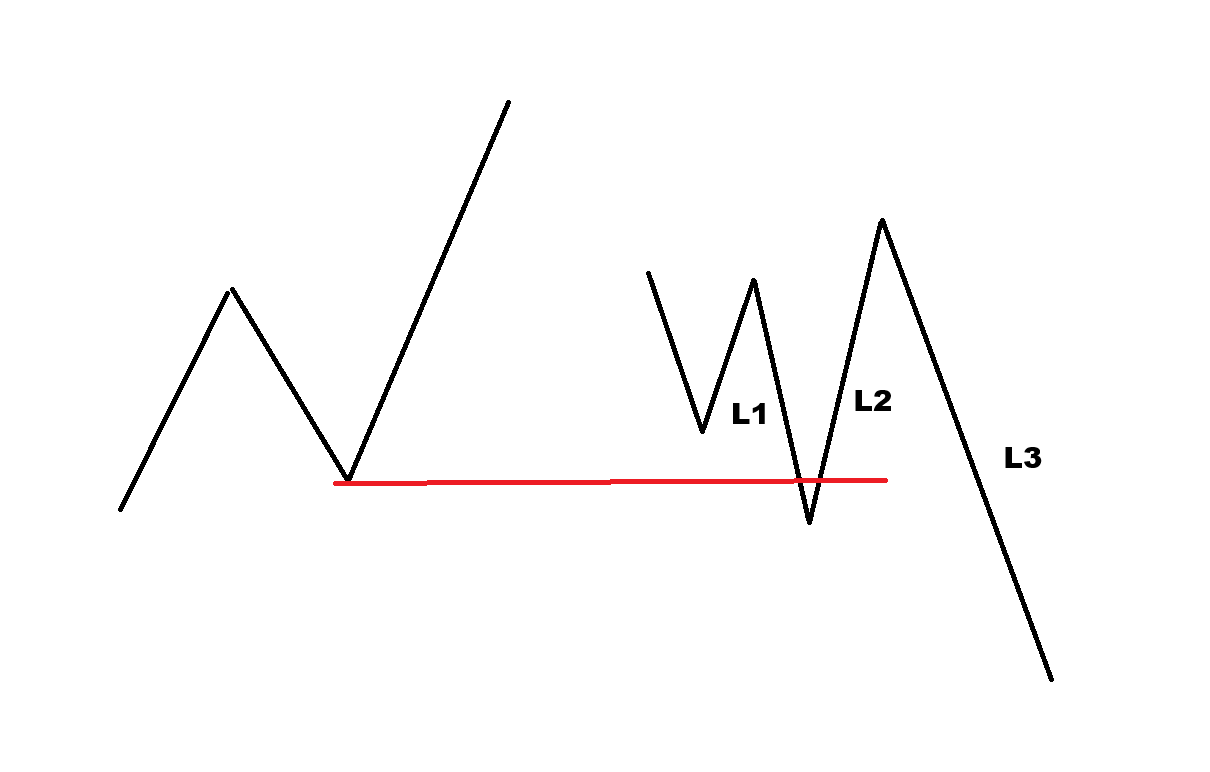
So, you’ll see the two scenarios in the diagrams above. Diagram 1 shows leg 1 losing a segment to the left (red line), leg 2 then gains the high of leg 1, and then leg 3 loses the low of leg 2.
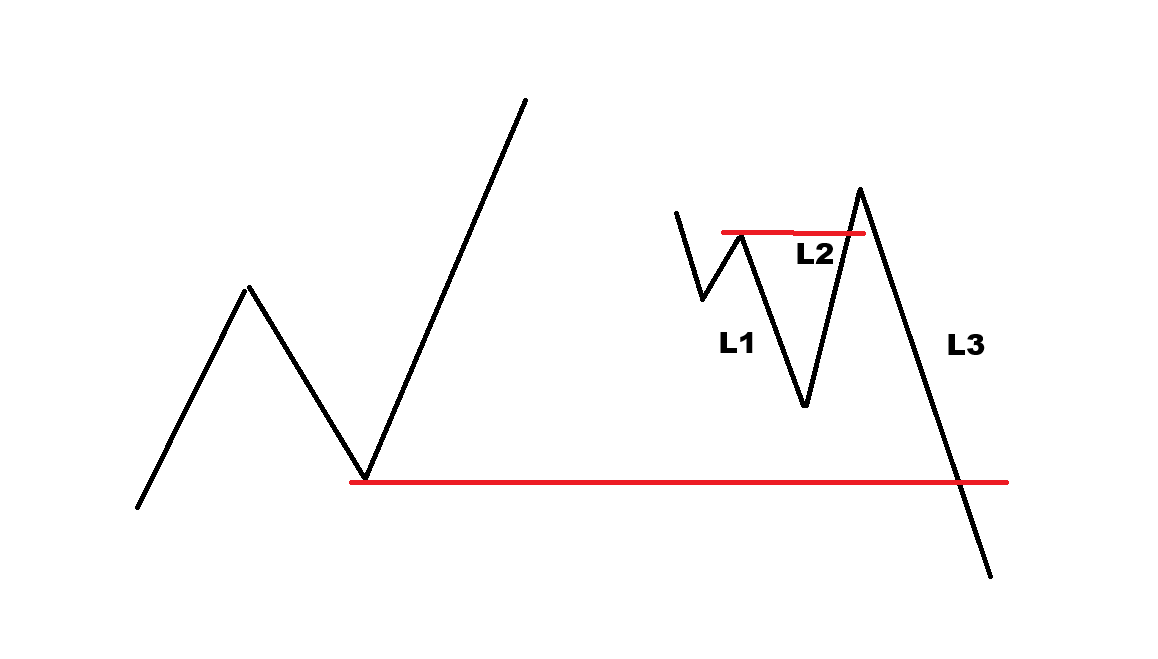
Diagram 2, all of those things still exist, but it does not validate until leg 3 actually loses the segment to the left.
So Why is This Important?
I won’t pretend to understand “why” this works. The best explanation I’ve ever been able to come up with is that the market is always seeking liquidity and this just happens to identify key areas of consolidation/buying/selling that provided liquidity for the origin and continuation of significant moves.
What you first need to understand is a very basic saying:
When you gain last lost you will go to highest untested, and when you lose last gained you will go to lowest untested.
This happens on all time frames, at all times, with markets shifting from lowest timeframes first in order to move the higher timeframes. The only thing that stops and resets this process (going to highest or lowest of a leg) is if you start the process over in the middle of it. Meaning for example, if you gain last lost you will go to highest untested UNLESS you lose last gained on your way there.
How do we use it?
This is where we get into setups. We have multiple variations of the same thing, and they all work via some sort of failure-to-do-something.
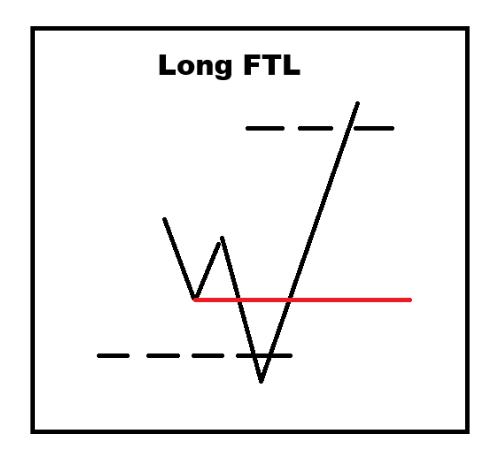
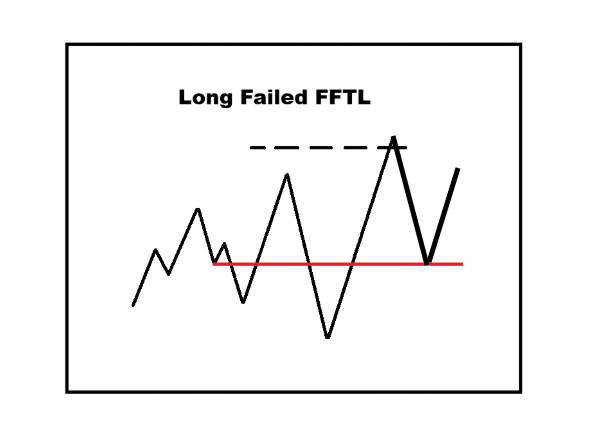
Failure-To-Lose (FTL) - Long
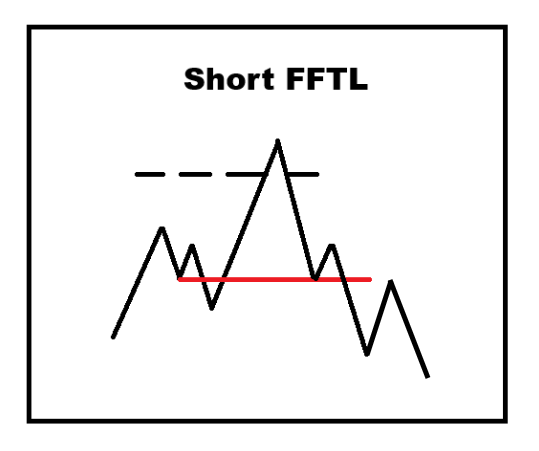
Failed-Failure-To-Lose (2FTL) - Short
Failed-Failed-Failure-To-Lose (3FTL) - Long
3 Leg Short (3LS) - Short
3 Leg Flip (3LF) - Long
First, I will lay out basic diagrams of each setup
FTL:
2FTL:
3FTL:
3LS:
3LF:
There are a few other variations, but those will be explained at a later date since these are the primary scenarios for pretty much any move on a daily basis.
You’ll also notice that I keep repeating the names of the setups and will do so again as I explain them individually. Repetition is the only way you will understand all of this. It will sound like Mandarin at first, and then you will start to remember each setup piece by piece but still have to think through how each one is formed…and then you’ll realize they are all the same setup, made up out of the same components, and you are just interacting with it at different points in time.
You might ask:
“If it’s all one setup, how do you know when to enter the trade, and how do you avoid getting stopped out on all of the different points of failure?”
That’s why we have a process for determining when and where we engage. If you burn these setups into your mind and what makes them valid, you will begin to see them EVERYWHERE. If you trade all of them you will go crazy, you might lose money, and you will definitely quit before you fully grasp the concepts.
This process has been used by traders who have gone on to manage and trade significant size.
Many more never made it past the discipline required to apply it.
Process > Setups
Before we go any further into setups, we need to define how and when these structures are allowed to be traded.
What comes next
The rest of this series breaks down the process that determines:
– When these setups are valid
– When they’re ignored
– And how they’re applied in real time
I also apply this process live each morning inside the Solo LVLS Discord, and the full framework will be available as a standalone PDF on Gumroad for those who prefer to work independently.
I answer questions inside Discord and on Substack only.
Now we can define how and where this structure is allowed to be traded, which is where most traders go wrong.
How do we identify levels?
This is the next step. So far, we’ve identified the building blocks of the process (segments and legs), and we’ve laid out the building blocks of the setups (FTL, 2FTL, 3FTL, 3LS, 3LF)
Now we learn where we interact with those setups, and it’s quite basic:
Every level will be a variation of the original FTL level.
These levels will always be lows/support in a down move.
Failure-To-Lose (FTL)
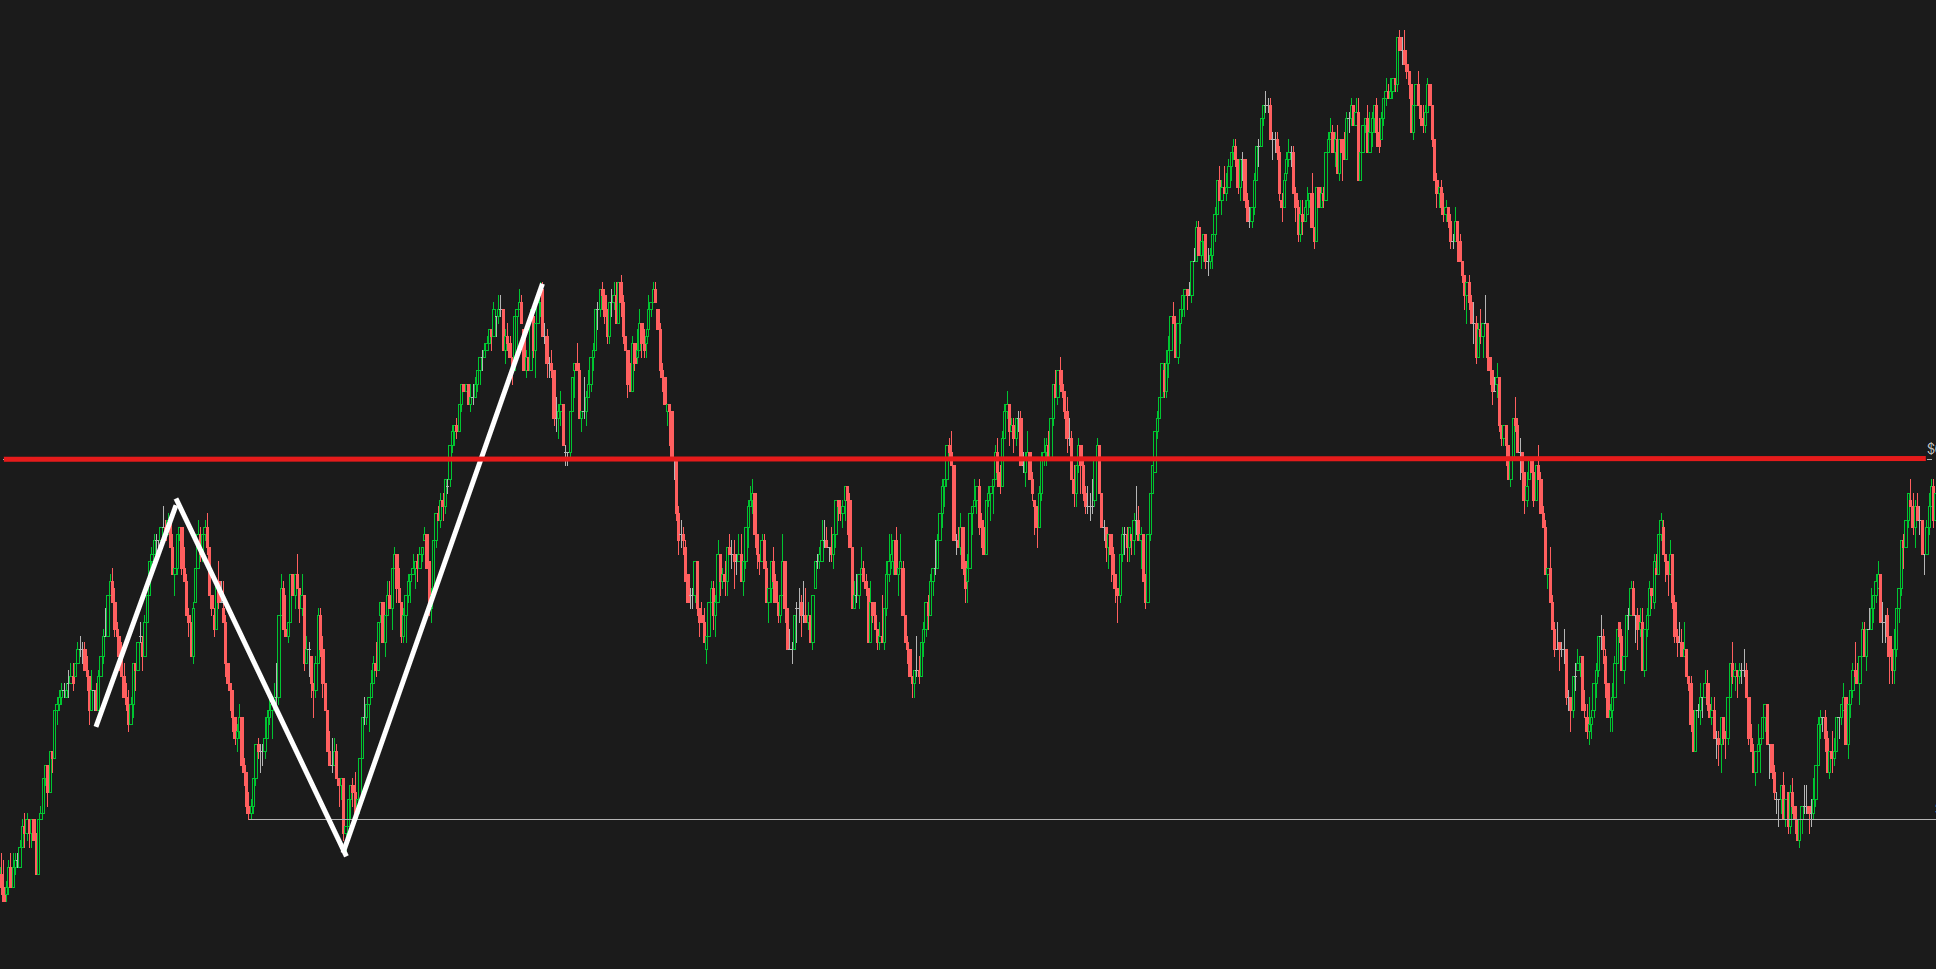
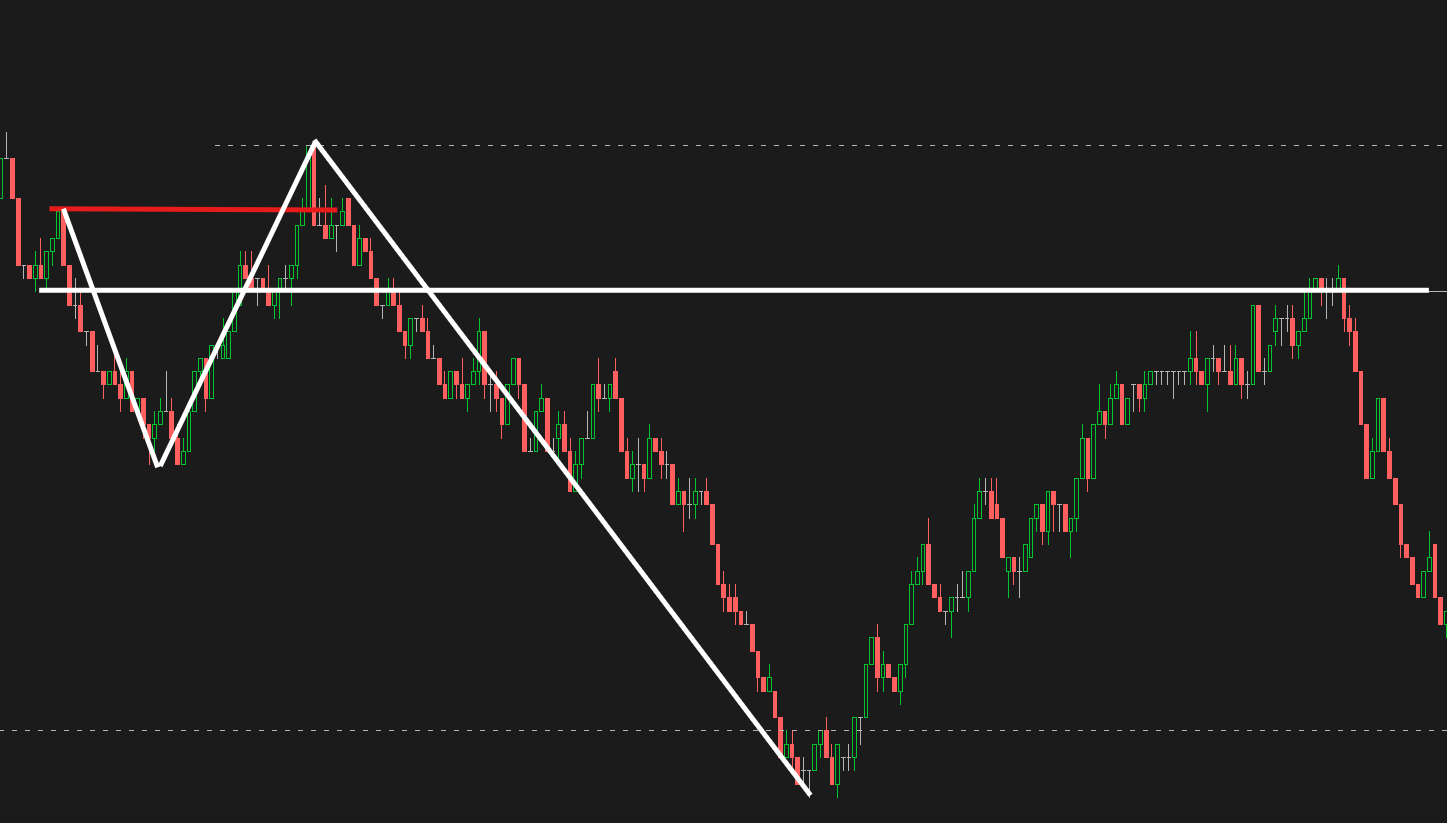
This is an example of 3 leg (white structure) that has gained something to the left (red line). This gives us a basic FTL setup, and you define the FTL level by using the support level in the down move that occurs just before the low of the leg.
This is your first example of the *lowest untested* level of a leg (keep that phrase tucked away in your mind, it’s important).
What you should also note is that the 3 leg and FTL are validated because they have directly gained a segment (or leg) to the left
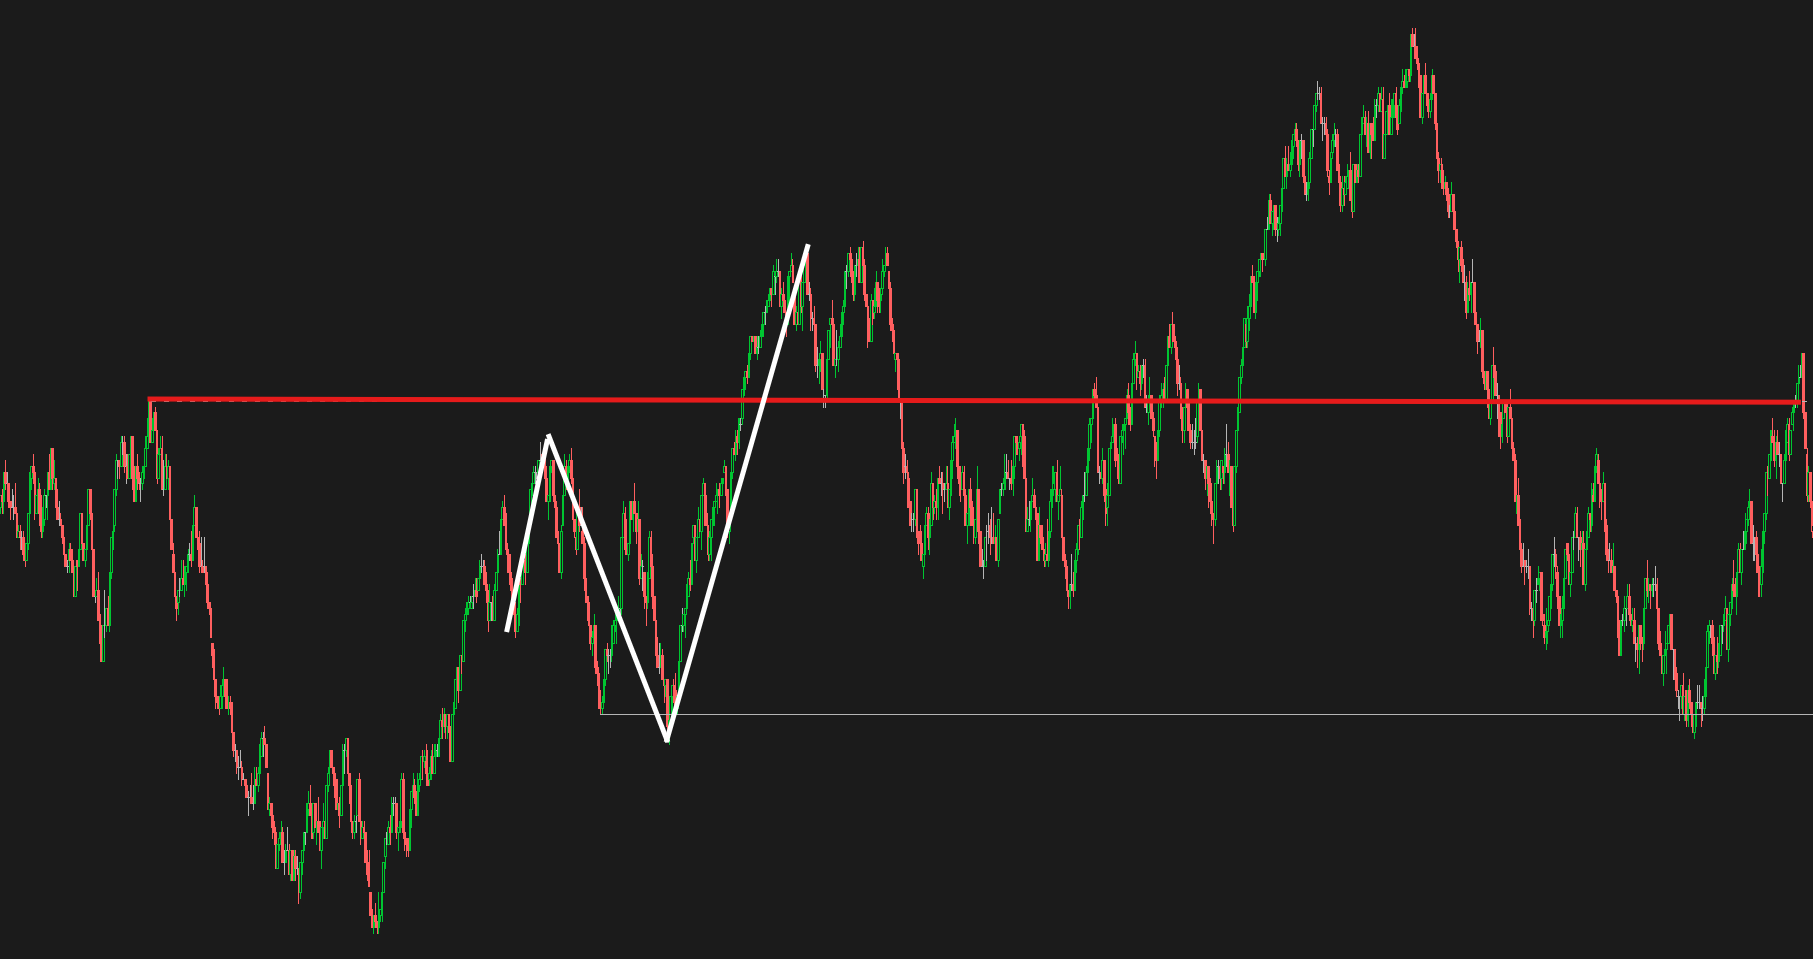
Failed-Failure-To-Lose (2FTL)
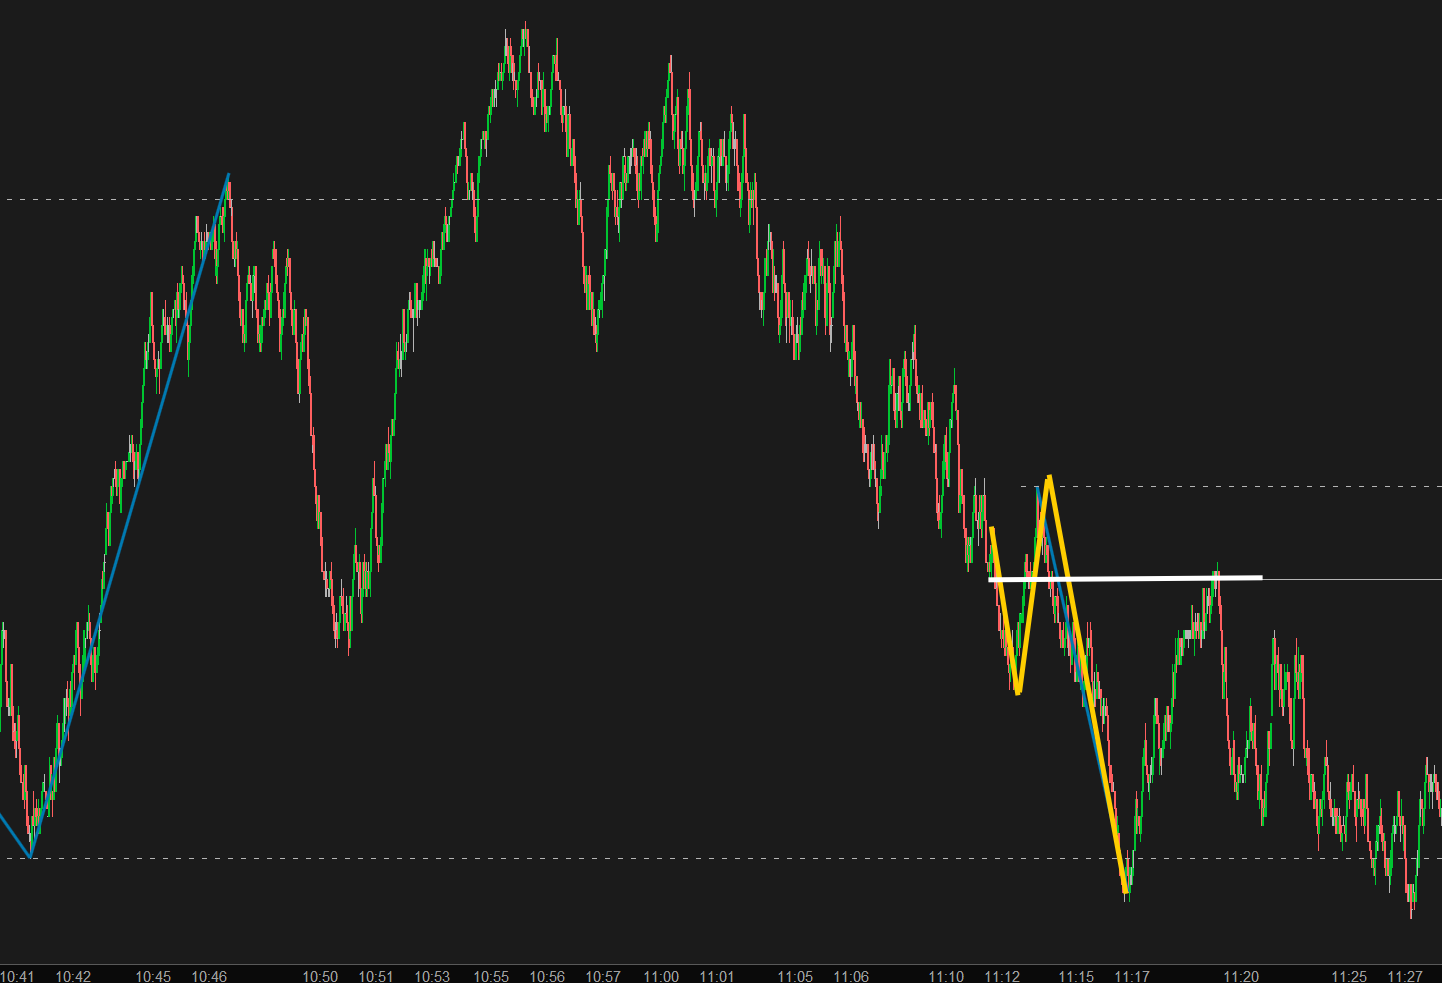
This is an example of a 3 leg (white structure) that has gained something to the left (upper red line). It presents us with the same FTL level, but this time it fails (break of the lower red line).
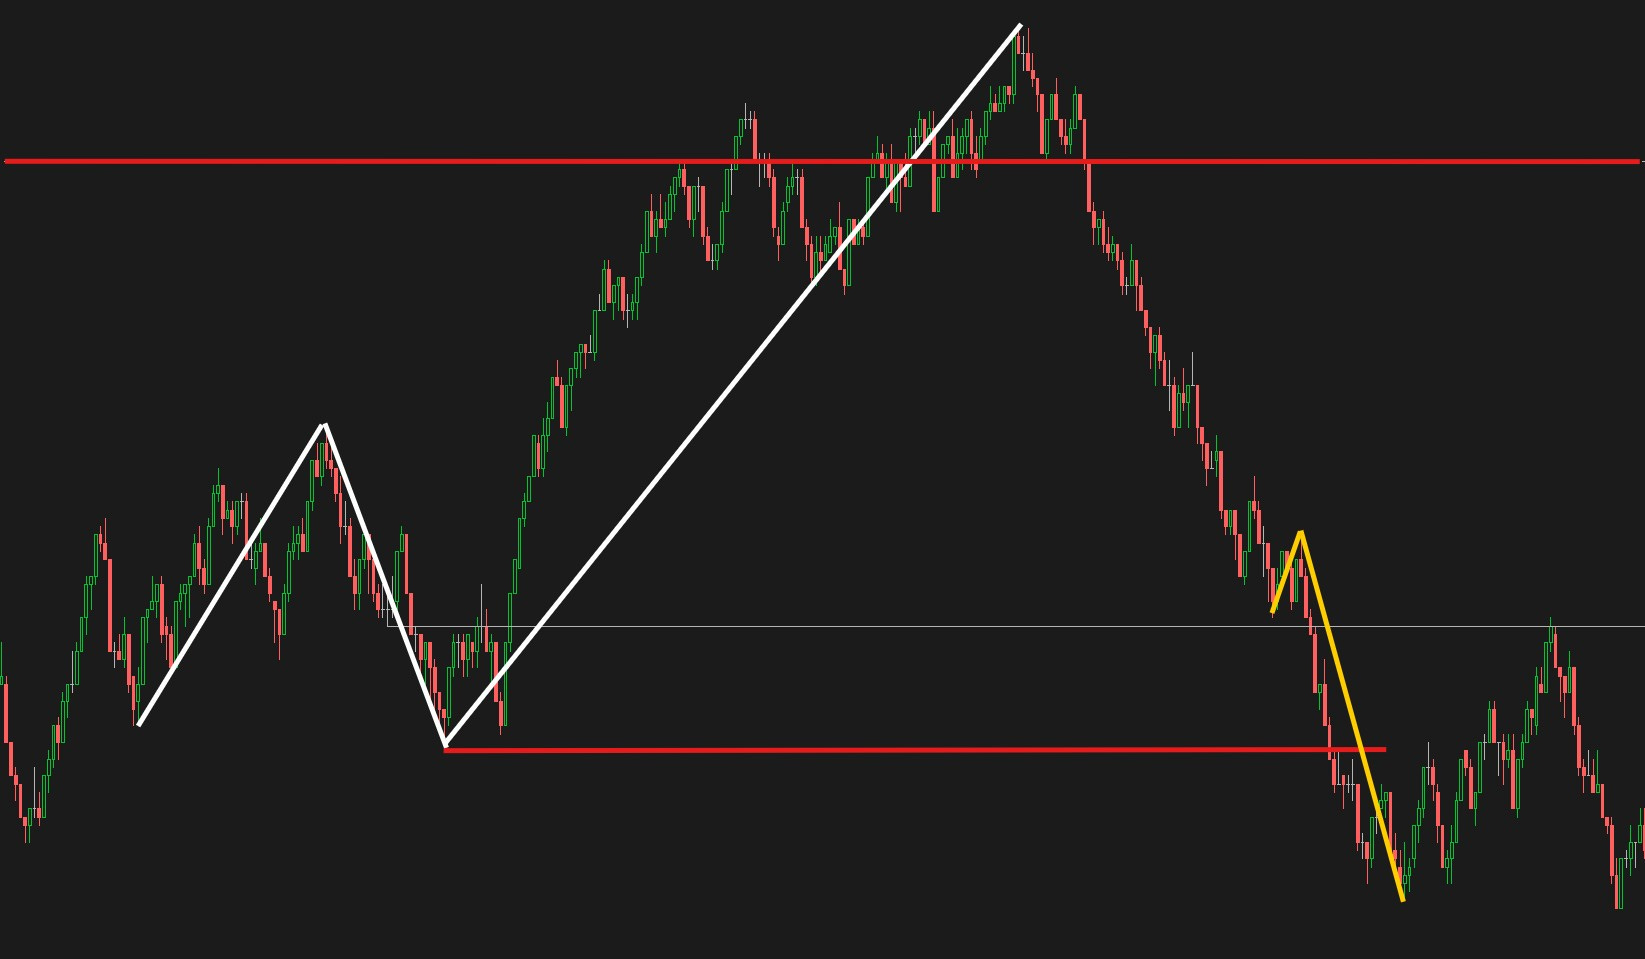
We then revisit the FTL level from the underside and it turns into resistance. Of note in this setup is the yellow structure. This is the segment that lost support and is important here because now a test of the 2FTL level does not “gain” anything which in turn makes it more likely that it will continue to new lows.
Failed-Failed-Failure-To-Lose (3FTL)
This is an example of 3 leg (blue structure) that has gained something to the left. In this scenario, it left behind a prior valid FTL setup from the first blue leg up. Naturally, this setup went through the progression of first being a FTL, then becoming a 2FTL, and with extension to new highs via the far-right blue leg it then becomes even more significant as a 3FTL.
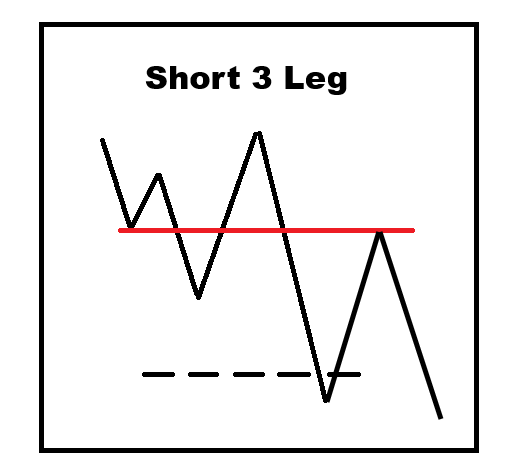
3-Leg Short (3LS)
This is an example of a 3-leg short (yellow structure)
The level will always be support from leg 1 down. If you think about how it is created while looking back at the FTL diagram, you will see that it’s just a level that had the potential to turn into a failure-to-lose level if we had reversed and extended to new highs.
These can be tricky because many of these setups can present with multiple potential levels to trade from. We want to short from the highest level in the structure. It gives us the best risk/reward and is the most likely place for sellers to step back in.
Here is a zoomed-in look at the structure:
We break above the red line which denotes that we have “gained” that white level of support. This doesn’t mean there is an opportunity to get long there, setups are structural, but they are only to be acted upon if they are valid via the process.
Notice how it looks like this?
Every setup has the same structural components. Remember, we are just interacting with them at various points in their development based on process.
This is why I will always preach process > setups.
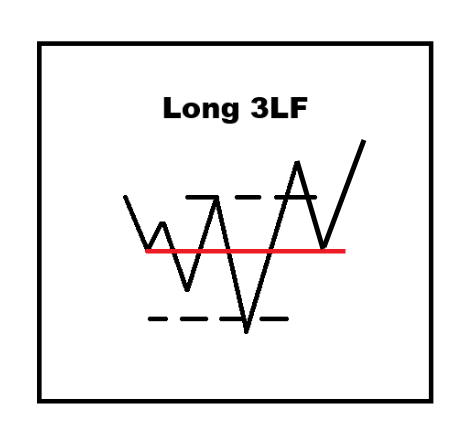
3-Leg-Flip (3LF)
Imagine the 3LS structure from above, now imagine we broken above the high of it and gained a segment or leg above that.
There are scenarios where the 3-Leg inverts and becomes a long, but it is more common in something like NQ vs ES that leaves behind more FTL/2FTL/3FTL as setups to get long.
What comes next
In the next chapter of the Process > Setups series, you’ll see how segments and legs determine when a setup is allowed to be traded and where risk is actually justified.
This is what puts you in position for asymmetric risk/reward, aligned with trend when it exists, and early when it doesn’t.
This is the free version. It’s enough for some traders.
For those who want the full framework—100+ pages covering segments, legs, setups, and execution—the PDF is here: The Process: A Discretionary Trader’s Framework for Structure, Setups, and Execution
Comes with 2 weeks of free Discord access. No pressure either way.